# Android SDK
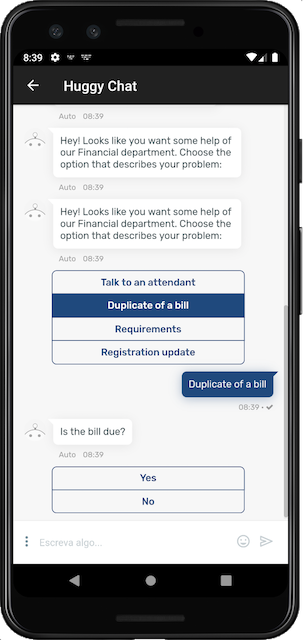
With Huggy Mobile Sdk you can integrate the Huggy Chat into your native Android app. The chat interface will be the same as configured on your Huggy Panel.
With this SDK you will only need to add a couple of lines to get your chat working on mobile.

# Getting Started
# Requirements
We recommend using Android Studio to build the sample app. The app’s build was tested with the following software versions and API levels:
- Minimum API level: 21
- Target API level: 28
# Installing the Android library
First of all you will need to download the last version of the android library .aar file that is available at the Releases Page (opens new window) of the repository.
# 1. Add files to project
To use the library, import it into your Android Studio project. To add the library into your project, you need to go to File > New > New module > Import .JAR/.AAR and select the path of Huggy's SDK Library.
After that you have to go to File > Project Structure > Dependencies and add the huggysdk as Module Dependency of your APP.
# Get the SDK Key from the Huggy Panel
At the Huggy Panel (opens new window) navigate to Configurations, click on Channels, choose SDK and copy the SDK_KEY code provided by us.
This key will be necessary to configure the chat in your app.
Finally you are ready to use the Huggy chat into your mobile project.
# Using in your project
To use the SDK in your Android app, after finish the installation step, go to the Activity who contains your WebView and import the Huggy package like import io.huggy.chatsdk.HuggyAttachments; import io.huggy.chatsdk.HuggyChat;. You can get a HuggyChat instance by calling getInstance(), passing your SDK_KEY. After this you are able to set up your WebView.
HuggyChat huggyChat = HuggyChat.getInstance(this.SDK_ID).setUpWebView(webView, YourActivity.this);
To send attachments you must override the Activity's method onActivityResult and put our method to handle the responses when any file is chosen.
@Override
protected void onActivityResult(int requestCode, int resultCode, Intent data) {
    ...
    HuggyAttachments.handleAttachment(requestCode, resultCode, data);
}
2
3
4
5
After this steps you will be able to see Huggy Chat on your app.
When a new chat conversation is initialized, the device will automatically subscribe to receive notifications. To disable and unsubscribe the device to receive notification, you should call the method unsubscribeFromTopic().
public class void logoutFromYourAPP(){
  huggyChat.unsubscribeFromTopic();
}
2
3
# API Functions
To use the Huggy Chat methods who are available at Huggy Chat Documentation, you must call the method callApiMethod(methodName: String, Object... args). That call works only if the Huggy Chat has already been loaded, if not, the calls will wait for that then will be executed.
# Example
HuggyChat huggyChat = HuggyChat.getInstance(this.SDK_ID, YourChatActivity.this).setUpWebView(yourWebView);

// Send message to chat
huggyChat.callApiMethod("sendMessage", "My first message");
2
3
4
# Push Notifications (FCM)
Huggy Chat SDK uses Firebase Cloud Messaging (FCM) to receive information about new messages. All messages received are data messages, and the user have to directly handle with each message. To be able to receive new FCM messages follow this steps:
# Step 1. Add messaging Firebase SDK to your app
In your Gradle file module (usually app/build.gradle), add the dependency for the messaging Firebase SDK.
dependencies {
 // ...
 implementation 'com.google.firebase:firebase-messaging:18.0.0'

 // Getting a "Could not find" error? Make sure that you've added
 // Google's Maven repository to your root-level build.gradle file
}
2
3
4
5
6
7
# Step 2. Handle new FCM messages
To be able to catch any new background messages or killed app you need have a class who extends of FirebaseMessagingService.
public class YourFireBaseMessagingService extends FirebaseMessagingService {

    @Override
    public void onMessageReceived(RemoteMessage remoteMessage) {
        super.onMessageReceived(remoteMessage)
    }
2
3
4
5
6
And put the following code in your AndroidManifest.xml
<service
    android:name=".java.YourFireBaseMessagingService"
    android:exported="false">
    <intent-filter>
        <action android:name="com.google.firebase.MESSAGING_EVENT" />
    </intent-filter>
</service>
2
3
4
5
6
7
We provide a basic style of notification, using the method notify(). It must be entered in the onMessageReceived() method.
public class YourFireBaseMessagingService extends FirebaseMessagingService {

    @Override
    public void onMessageReceived(RemoteMessage remoteMessage) {
        super.onMessageReceived(remoteMessage)

        Map<String, String> payload = remoteMessage.getData();
        String title = "Notification title";
        String message = "Notification message"

        HuggyNotification.getInstance(this).notify(payload, R.drawable.icon, title, message);
    }
2
3
4
5
6
7
8
9
10
11
12
The message received on remoteMessage.getData will be like the following json schema:
{
  "sender_name": "abcdf",
  "sender_id": "1234",
  "sender_image": "abcdf",
  "sender_image_small": "abcdf",
  "sender_email": "abcdf",
  "type": "abcdf",
  "id": "1234",
  "situation": "abcdf",
  "text": "abcdf"
}
2
3
4
5
6
7
8
9
10
11
# Notification example

# Auxiliary methods
We provide some optional methods above:
- handleTapNotification: to open some Activity, like the chat page when a user taps on a push notification. To do this, you need to pass a
TaskStackBuildertohandleTapNotificationmethod.
handleTapNotification(TaskStackBuilder stackBuilder)
- notifyAppInForeground: to enable notification when the app is in foreground.
notifyAppInForeground()
- notNotifyAppInForeground: to disable notification when the app is in foreground.
The default is to not receive notification when the app is in foreground.
notNotifyAppInForeground()